Private Music Lessons
Workshops • Performances
|
Learning to Hold the Violin Bow
— A list of steps for beginners —
|
|
Introduction to the violin bow hold
There is no single correct violin bow hold. Violinists hold and propel the bow in many ways ... most striking is the difference between a 'down stroke' posture and an 'up stroke' posture.
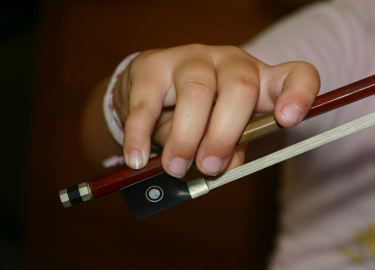
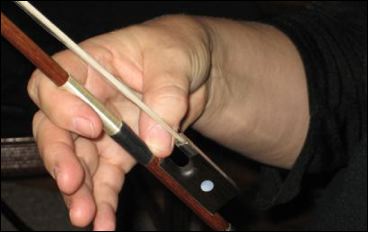
- Down stroke position: Fingers are quite arched in the standard down stroke position, as shown in the photos here. Even the thumb is bent.
- Up stroke position: Fingers are slightly more elongated in an upstroke position (not shown here.)
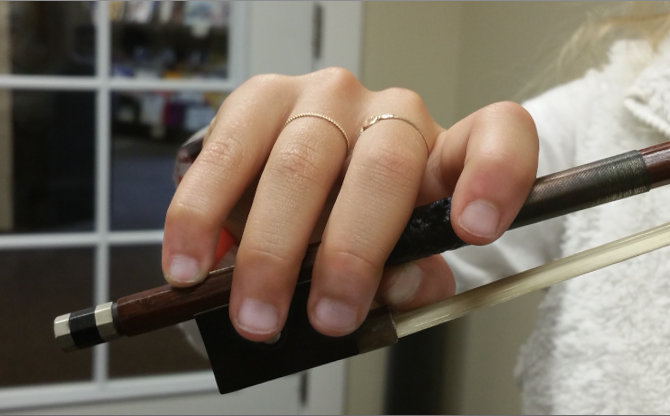
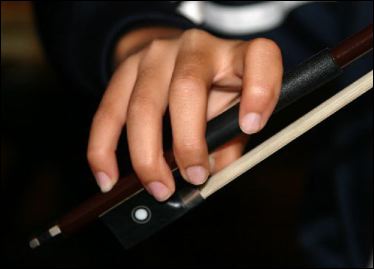
Though these photos are slightly different, they show a basic down stroke position. I prefer the angle and arch of the fingers in the middle and bottom photos.
The upper photo is an 8 year old's nearly perfect bow hold. There's a good tilt to the hand position (pronation), excellent thumb position, a good separation between the index and middle fingers ... however the pinky's middle knuckle should be bent. Ideally all knuckles are bent in a down stroke position. For beginners, thedown stroke hold is fine for all stokes.
The second photo shows an overly distance space between the index and middle finger, but otherwise it's a good hold. More pronation would help.
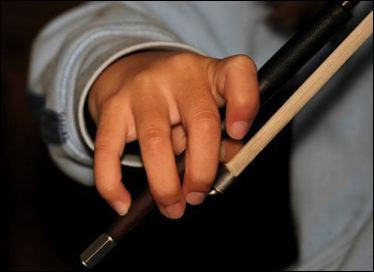
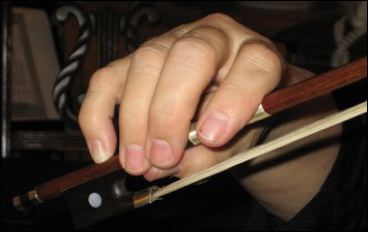
The third photo shows a small spread between the index and middle fingers. A narrower spread is advised. Relaxing the middle finger will cause it to lean toward the ring finger.
The bottom photo shows a nearly perfect bow hold, of a second grader with about 14 months experience. This is her natural hold, not a posed shot.
I prefer teaching the down stroke position first, where the thumb and all fingers are arched into a flexed position. This flexed position encourages people to avoid extended fingers (in other words, they are unlikely to straighten fingers onto or toward the bow.)
Once you've learned the down stroke position, learning the upstroke hold is relatively easy, it's just a slightly more relaxed posture that in which the fingers naturally elongate.
Be calm and careful when practicing your bow hold. Make only gentle contact with the bow, resting your fingers lightly against it. Focus on using the minimum effort possible. Soon enough you'll need to you exert pressure for tone and volume, but you'll do so through pronation, not by grasping or squeezing the stick.
Above all, avoid grasping the bow or extending fingers. A single straightened finger will lock the wrist. Grasping the bow also locks the wrist.
Please note, there are other essential issues that I won't cover in this brief article, such as:
- wrist movement
- the reasons surrounding the importance of a relaxed bow hand
- details regarding balance and pronation
- the importance of learning the center of the bow first
- focusing on the elbow hinge (eliminating the should hinge)
But I recommendf thatemphasize these points at each lesson. Do a brief pre-flight check with the bow before you pick up the violin. And before you start each song or exercise,
check your bow hold.
Please let me know if you have any comments.
OK, here we go! |
| |
Prioritize the bow hold until you master it
This article assumes that you're new to violin, or you've rededicated yourself to improving your bow hold. If one of these descriptions fits you, here's my advice.
Practice your bow hold for 3 to 5 minutes before picking up the violin. Spend some time at the beginning of each practice session to reacquaint yourself
with the recommended bow hold.
Start your practice sessions in this manner until you achieved a relaxed, reliable bow hold. Once that has occurred you may no longer need to start with with prolonged attention on the bow.
Whatever the case, take a moment before youk to to observe your hold and fashion it into shape.
Then get your violin. It’s easiest to learn to hold the bow with the violin aside. If you attempt to learn the bow hold with the violin under your chin, you'll find the task is significantly more complicated, and your progress easily prone to derailment. Better to concentrate on one thing at a time. |
| |
Relaxation and movement warm up
One of the hallmarks of violin mastery is relaxed fluid movement in the arm, wrist and hand. Nevertheless, not all players rely on fluidity to the same extent. There are lots of idiosyncratic
styles that work effectively, even some that look awkward or incorrect.
In learning the bow, your job is to stay away from techniques guaranteed to fail: even a small amount grasping energy will lock your wrist. I'll say it a gain, because I always need to remind
students: the extension of fingers immediately constricts wrist movement and impedes flexibility. So be on the watch particularly for those grasping or extension. Extension is the staightening
of fingers, like when you point.
Discovering relaxation is more challenging that you'd expect. And I'm convinced there's an element of human nature that causes us to grasp with unecessary force. I see it again and again.
When people have the good intention to do a good job, they tend to use more effort than is required.
Practice these 'wrist' relaxation exercises, repeating each about ten times:
- Wrist drop: Hold your forearm at 45°, and relax your wrist until your handfalls.
- Extend your wrist quickly and fully. If you're relaxed your fingers will naturally flex into soft "fist" shape. If the hand stays open, and you finger point, keep searching for the relaxation.
- Starting with a 'dropped wrist, close your fingers quickly into a fist. The result should be an unintentional extension of your wrist. This is the type of movement used in a collé or
up bow staccato stroke.
|
| |
Get set up and ready
Put your violin in a good location
Place your violin out on a desk, table top, or dresser, where it will be easy to pick up with just your left hand.
Tighten the bow
Notice the distance between the stick and the hair at the center of the bow. Turn the screw until the until the hair is about a third of an inch from the stick.
|
| |
Bow hold warm up
Allow some time at the start of each practice to establish a good bow hold. Follow the detailed steps outlined below each time you pick up the bow. They’ll remind you how to position your hand and fingers.
During your practice session check your bow hold to make sure it's still in good shape. If so, continue on. If not, stop and do the warm up again.
In time you’ll learn to pick up the bow instantly and effortlessly with your right hand, and maneuver properly into your hand without thinking. However, developing this skill usually take weeks or months.
Here’s an ideal practice session for beginners (or for anyone who want to relearn and improve their bow hold.
|

|
Left hand instructions
Hold the bow upside down (hair facing up) in the wrong hand (your left hand).
Make sure that you position your fingers and thumb behind the middle of the frog, well away from the hair, leaving plenty of room for your bow hand fingers (which later youll move into place.)
Angle the tip of the bow upward so you look like a left-handed fisherman (the angle is 45° from the floor.)
Position your hand about heart level, directly in at the middle of your chest, centered to your sternum.
Maintain the fisherman while you follow the instruction for positioning your right hand. Before placing any of your fingers on the bow, check and make sure all is on track with the left hand!
NOTE: Starting with the bow upside down and in the wrong hand may seem odd indeed -- especially if you've worked with the bow before, but there are distinct advantages:
- It affords a better view of your accomplishment. More importantly it allows the bow to rest balanced in your fingers, in a manner that feels just like playing.
- It fosters relaxation, much more so than other methods.
- It allows you to concentrate on the correct positioning of the hand and fingers without the added burden of supporting a “right side up” bow.
- It may slightly distance you from any previous habits, affording you a less biased starting point!
When learning the bow hold right side up, people tend to “over hold” it, and grasp it unnecessarily. It’s mainly a matter of relaxation and posture. People error understandably, through the best of intentions. When we intend to do a good job, we often exert more effort than required. Additionally students know that they may easily drop the bow, and by the best of intentions (the earnest desire to get the bow under control) an overly effortful approach may set in. Whatever form this tension takes, it can quickly become a habit -- one that’s hard to undo.
Be patient and learn a relaxed bow hold from the start -- spare yourself the unnecessary task of unlearning an unusable bow hold.
|
|
Thumb flexing instructions
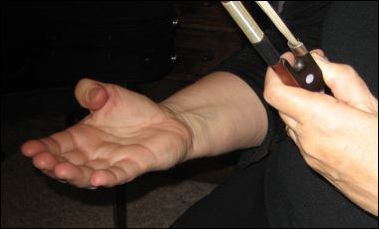
Turn your right hand palm up, keeping your elbow relaxed at your side.
Open your fingers slightly so they are somewhat flat, but still quite relaxed.
Flex your wrist slightly (this will raise your fingers slightly above your forearm.)
Practice flexing and relaxing your thumb: bend all joints of your thumb up over the palm of your hand, then relax it open again. Repeat this several times, bending your thumb so the tip curves over the center of your palm.
Don't pinch the base of the thumb in toward your hand. Don't slide your thumb along your palm or near your palm.
Bend your thumb again, positioning the tip over the center of your palm. Maintain this position and notice the direction that your thumb nail points. There is no correct angle -- just notice where it points.
|
|
Point your thumbnail downward
- Move your elbow and/or rotate your wrist (pronate) until your thumb nail points straight down. When you've accomplished this you're ready to move the thumb into its position on the bow.
|
 |
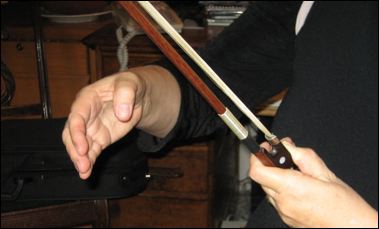
Position the tip of your thumb on the stick, beneath the hair
- Move your right arm toward the bow, positioning the tip of your thumb so it touches between the grip (the band of leather) and the edge of the frog.
- Leave all the other fingers out of contact with the bow, relax, and gently arched.
If you do this correctly you should feel contact on both sides of your thumb. You should also feel the bow hair resting against your thumb above the nail.
Double check both hands:
- Check to make sure the bow is at 45° centered to your chest
- Make sure the tip of your right hand thumb points straight down.
- If everything is correct then proceed, otherwise start over from the beginning.
When your thumb is correctly positioned between the grip and the frog, bring your index finger under the bow and rest the stick lightly on it, the bow crossing between the two knuckles. Make sure you don't touch with any other fingers yet! |
 |
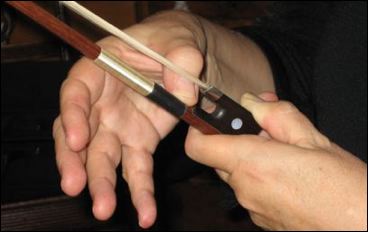
Place your index finger beneath the stick
Rest the side of your index finger lightly beneath the stick. Place it so the stick rests on the segment of finger between the two distal knuckles. (The distal knuckle is the one most 'distant' from your body. The proximal knuckle is the one in closest "proximity" to your body.)
Do note curl the finger in an attempt to grasp the bow, just support with balance.
The Thumb-Index balance
With these two fingers in position (just the thumb and index finger) carefully release your left hand from the bow, and balance the bow between the thumb and index.
The two-finger hold you have right now is just balance -- strength comes later when you play.
Notice the light pressure of the bow against your thumb and index finger. This is caused entirely by gravity and not through any effort or squeezing of your fingers. It's quite important to pause and notice this sensation. It is very much like the feeling of playing on string -- except that your hand is still upside down. This is how the bow will feel when you use it properly to produce a medium or light sound: light pressure on the tip of your thumb; light pressure where the stick crosses your index finger; the hair resting against your thumb ... and the rest of your fingers quite relaxed.
- Check to make sure all your fingers are relaxed yet slightly flexed.
- The proximal knuckle of the index finger shouldnt hyperextend keep it flexed and don't allow it to bend inward.
- The crotch of your index finger and thumb should be round, not pinched together
- All finders are arched (flexed); no fingers are straightened. The flexor and extensor muscles near your elbow are relaxed and not fatigued
|
 |
Position the other fingers
With the previous balance achieved, and all fingers flexed, including the thumb, practice flexing and straightening your middle and ring finger, so they move as a pair, resting against each
other.
Flex them together so the middle finger goes slightly over the stick: stopping near the tip of your thumb or actually touching it. Leave the pinky arched and off the stick. Again, straightening
and flexing your middle and ring fingers. Then leave them in place on the bow, and practice arching and relaxing your fingers.
Lastly, position your pinky, or fourth finger. This is the trickiest finger.
Watch out. The fourth finger tends to straighten and reach for the stick. Relax it so it is arched. Extend it toward the stick. If this causes you to straighten your little finger very much, relax it and try again.
After a number of tries, if you can't reach the bow with an arched little finger, bring the bow further under your hand, by flexing your other fingers. This may take a good bit of repetition, but eventually you'll get it. Maybe not today though. |
| |
Rotate the bow to a vertical position, then over to a normal position
With your thumb and fingers accurately in place, gently bring the bow to vertical.
Wiggle the bow slightly and see if you can maintain control with such a light hold. If all goes well, see if you can wave the tip slowly forward and back, the hair moving toward your left shoulder. Play with this a little bit. Moving just out of the vertical position and then back.
When you're rotated the bow points to 10 o'clock you should begin to feel most of the bow's weight pressing up on the tip of your pinky.
Now practice a windshield wiper movement, alternating from a Thumb/Index balance to a Thumb/Pinky balance.
Finally, tip the bow all the way over, so it's in a playing position. As you lower the tip you the weight transfers off your index finger, and now presses upward fully onyour pinky. If you don't feel upward pressure on your pinky, then you're probably squeezing the bow and holding it too tightly. |
 |
The final result here is not perfect. All fingers are a little too far up the bow, the thumb has straigtened, the whole hand could be more pronated, athe little finger looks like it's pressing, as if it's receiving more pressure than just the weight of the bow.
When you get an imperfect result, go through the steps from the start and see if you can make some improvement for the day.
NOTE: This material is updated regularly, so you may want to review it at some point in the future. If you are a student, you probably value most by following these instructions daily in detail for a week or two. After that point, you'll probably be able to recall the steps yourself ... or you may have already attained a relaxed and versatile bow hold. |
© John Blasquez 2006

Private Music Lessons
Workshops • Performances
|
|
|